I finally got around to unwrapping our new maple syrup evaporator that we will be using to make maple syrup in the upcoming 2013 sugaring season.
For those unfamiliar with maple syrup making (AKA Sugaring), you need an evaporator to make syrup. We used a gas grill last year as our evpaproator. Basically, you boil down the collected sap from the maple trees, which contains 1-3% sugar, and 97-99% water, and by boiling off , or evaporating, the majority of the water you concentrate the sugar in the sap making maple syrup.
Last year I used a couple of steam table pans on my propane grill to boil the sap down to make syrup, this took a LONG time with evaporation rates of a couple gallons and hour. Keep in mind that it takes upwards of 40 gallons of sap to make 1 gallon of syrup. That means you spend a lot of time watching the sap boil.
This year we have decided to expand our operation by tapping 50 trees in lieu of the 12 we tapped last year. Expanding to 50 trees means we should be collecting 500 or so gallons of sap during the season in lieu of the 100 gallons we collected last year. By choosing to tap more trees we needed to find a more efficient way to boil the sap that would have a higher evaporation rate that our grill and consume a more economical fuel like wood.
After a lot of research on the internet, specifically on the Mapletrader forums, we determined that a hobby sized evaporator would be the perfect fit for us. We looked at all the reviews on commercial and homemade style evaporators and I decided I would use an evaporator from WF Mason. The model we chose was Bill Mason’s 2’ x 3’ Hobby Evaporator, with an evaporation rate of 7-9 gallons per hour, and rated for 1-50 taps, this seemed perfect for us, where we only have 50 tap-able maples on our land.
Bill Mason was great to work with and was very helpful, we corresponded by both email and phone, and he was very responsive. I got my order in early around November, and was surprised when I got the call that it was ready the first of December. Bill met me with the evaporator here in New Hampshire and gave me the once over on the set up of the unit. Everything was packed well with shrink wrap and brown paper to protect the pans. The process was great and Bill was great. Craftsmanship is top notch and I have been itching to get things opened and set-up all throughout the holidays. I finally had time to unpack everything and here is a quick photo tour of our new unit!
The fire-box – basically a custom steel box that needs to be insulated and lined with fire brick. This is where the wood fire will be below the stainless steel pan that holds the sap.
Front view – showing the stove door, and ash door, and the ash grate.
Accessories – one photo showing the two valves. One is a syrup valve and the other is for the sap pre-heater. In the bag is also some pan gasket material that goes between the black fire box and the stainless steel pan to create a tight seal. I also added the syrup thermometer option when buying the evaporator.
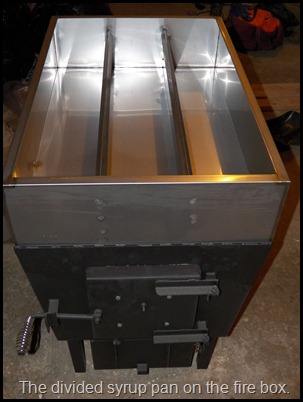
The Syrup Pan – this is a stainless steel pan 24” x 36” divided into 3 section and is designed for continuous flow operation. Essentially sap enters one section of the pan and eventually syrup is drawn off in another section. I still need to see this to believe it, but apparently if your pan is level, as you boil sap in the pan, a gradient will develop due to the different density of sap to syrup so that as you boil, the syrup with a higher density than the sap will flow to one side of the pan. There are actually openings in the dividers to allow the flow. I can not wait to see this in action because it’s a process completely different than the batch process I did on my gas grill. The syrup pan takes 7.5 gallons of sap to fill it to a 2” depth!
The Draw Off – I attach one of the valves to this spigot and this is where I draw off syrup when it reaches the correct temperature and sugar content. The circular port to the left of the draw-off is where the thermometer is mounted. The photo on the right shows one of the triangular ports where sap can flow through the divider and the rectangular port is where syrup is drawn off.
The Pre-heater – basically this is another stainless steel pan that sits on top of the syrup pan. This is where cold sap is added and pre-heated before it is slowly released from a valve that attaches to the threaded connection in the bottom right of the pre-heater pan. This ensures that I am adding hot sap to the continuously boiling syrup pan. If you did not pre-heat the sap and added cold sap you could kill the boil in your syrup pan. The pre-heater holds almost 5 gallons of sap if filled to the brim!
The Unit – essentially this is how it will look when we start to boil. There are still several steps that I need to do before the first boil. The main task being insulating and bricking the evaporator with fire bricks. That is a task for another day.


Pingback: Maple Sugaring – Rite of Spring | Eliza Waters